Introduction
This laboratory consists of three projects which, together, will lead you through some aspects of Handel-C’s bit manipulation operators and carry you on to one of the forms of video output possible on the RC200E.
Keyboard to SevenSegment Displays
Create a project named Keyboard2SevenSegment, and set up both Debug and EDIF build configurations in the usual way with one exception: you will need to include a library for using a keyboard for input. The library name is pal_keyboard.hcl, and the corresponding header file is pal_keyboard.hch. The procedures available in this library are documented in the Pal Cores manual in the Celoxica/Documentation/PDK directory. (Also available in the online manuals you can access from the course web page.)
This project is very simple: continually read from the keyboard input and write the 8-bit character codes the user types as two hexadecimal digits on two seven-segment displays. Use the Handel-C take (<-) and drop (\\) operators to extract the two 4-bit values you need from the 8-bit characters received from the keyboard.
When you simulate this project, the Pal Virtual console will include a “Keyboard Port” panel where you have to type in keyboard scan codes to simulate keyboard input to the FPGA. There is documentation on scan codes in a PDF file you can access from the Manuals web page. You type the scan codes as decimal numbers in the lowest part of the left side of the Keyboard Port panel. You may have to type 3-4 arbitrary values to initialize the keyboard before it will respond to your inputs as keypresses.
You can test your ASCII and scancode skills: use the Pal Virtual Console to make the hex displays shows the values 41, then 61, and then 41 again.
When you test your project on the RC200E, watch out for “overengineering” the code. If you run the keyboard input code in parallel with the seven segment displays you won’t get the behavior you want. As soon as you call PalKeyboardReadASCII(), the register that receives the ASCII code will get set to 0x00 and will stay at that value until a key is pressed. Simply update the seven segment displays only when PalKeyboardReadASCII() returns and you will be okay.
Keyboard to Console
Maybe you noticed the Pal Console API when you were looking up the Pal Keyboard. If not, go back and read the fine manual!
This project is separate from the previous one, but you will probably want to copy the code from that one to start this one. Call this project Keyboard2Console, and call your source file keyboard2console.hcc. Add to it the feature of writing on the touchscreen both the ASCII and hexadecimal representation of each character the user types, each on a new line. The output should look like this after typing “AaA”:
When writing to the touchscreen, the clock rate must match the VGA clock rate used for drawing pixels: 25.175 MHz. You should use this clock rate for both Debug and EDIF.
For the Debug build configuration, the Pal Virtual Console will now have two tabs on the right side: the KeyboardPort tab and a new one marked “VGA 480@60Hz.” The new tab lets you type characters directly into the simulator without having to enter scan codes. Watch the status line at the bottom of the console to see which scan line is being updated. It takes several seconds to simulate a complete screen refresh cycle, which takes just 1/60" in real time.
Keyboard to VideoOut
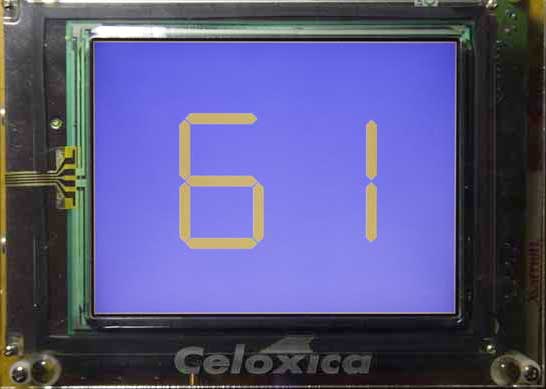
Start another project, named Keyboard2Video. This one will still use the Pal Keyboard API, but will not use the Pal Console. Instead, you are to draw a picture of the seven segment displays on the screen:

Look up the PalVideoOut functions, and set up your project so you can use PalVideoOutGetX(), PalVideoOutGetY(), and PalVideoOutWrite(). Note that you will not be able to use the Pal Console macros when you are using the Pal Video Out macros. The main loop of your program will write one of two colors on each clock cycle, using code such as the following:
while (1) { if (isForeground()) PalVideoOutWrite(videoOut, foregroundColor); else PalVideoOutWrite(videoOut, backgroundColor); }
The challenge is to define isForeground() as a macro expression (combinational logic only) rather than as a macro procedure or function (sequential logic). Using combinational logic, you have to decide whether the current (x,y) coordinates of the video output controller are within a segment that is supposed to be displayed or not.
Set up a 16-bit global variable, with each bit corresponding to the decimal point and the seven segments in the two seven segment displays you are to draw. (You will not need to display decimal points for this project.) You can use two 8-bit variables if you prefer. If a bit is on, the corresponding segment is visible, but if it is off, the corresponding segment is part of the background. As ASCII characters arrive from the keyboard, update the bits to indicate which segments are to be displayed. For example, if the leftmost 4 bits of an ASCII character are 01102, the character '6' should be displayed in the left seven segment display, which corresponds to segments A, C, D, E, F, and G, so the leftmost eight bits of the 16-bit global variable should have six ones and two zeros like this: 011111012. Use a 16 × 7 Handel-C rom as a lookup table to do the translation from hexadecimal digits to “shape masks,” and check that your code is working so far by displaying the ASCII codes on the real seven segment displays using the PalSevenSegmentWriteShape() macro procedure. You have to map the segments to the bit positions in the same way as that macro requires: '.GFEDCBA'
To make your code easy to adjust, define two global parameters, length and thickness, corresponding to the length and thickness of the main bar of each segment. Design the code that follows so you can change the shapes of the segments just by altering these parameters.
Organize your code as a hierarchy of macro expressions. isForeground instantiates two instances of the top-level expression, insideHexDigit(shape, ulX, ulY), where the parameters give the shape mask for the hex digit to draw and coordinates of the upper left corner of each digit on the 640 × 480 screen. (Note that Y coordinates start with zero at the top of the screen.) The insideHexDigit() macro expression then instantiates two other macro expressions, horizontalSegment() and verticalSegment(). These expressions are passed the coordinates of their upper-left corners also, which are expressed using the coordinates passed to drawHexDigit() combined with the values of the length and thickness parameters.
Here is some pseudo-code for segments F and G to make the above more concrete:
shape[5] && verticalSegment(ulX, ulY) // Segment F || shape[6] && horizontalSegment(ulX, ulY+length+thickness) // Segment G
That is, segment F is a vertical segment with its upper left corner in the upper left corner of the digit, and segment G (the middle bar) is a horizontal segment with its upper left corner at the left side of the digit, but offset from the top by the length plus thickness of a segment. You should draw a sketch of seven segment digits to make sure this is what you want.
Inside the verticalSegment() and horizontalSegment() macros, you will have to test whether the current values of PalVideoOutGetX() and PalVideoOutGetY() are inside the visible parts of that segment. Start by getting the rectangle in the middle of each segment to work, then add the code to test for the triangles at the ends.

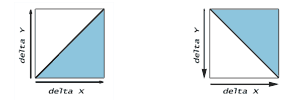
Note that you can tell which side of a 45° line a point is located on by comparing two values: delta X and delta Y. For example, the shaded areas of the diagrams below corresponds to points where delta X is greater than delta Y:
